lightning-record-form LWC
lightning-record-form component allows you to quickly create forms to add, view, or update a record. Using this component to create record forms is easier than building forms manually with lightning-record-edit-form or lightning-record-view-form. The lightning-record-form component provides these helpful features:
- Switches between view and edit modes automatically when the user begins editing a field in a view form
- Provides Cancel and Save buttons automatically in edit forms
- Uses the object’s default record layout with support for multiple columns
- Loads all fields in the object’s compact or full layout, or only the fields you specify
lightning-record-form is less customizable. To customize the form layout or provide custom rendering of record data, use lightning-record-edit-form (add or update a record) and lightning-record-view-form (view a record).
The object-api-name attribute is always required, and the record-id is required only when you’re editing or viewing a record.
lightning-record-form implements Lightning Data Service and doesn’t require additional Apex controllers to create or edit record data. It also takes care of field-level security and sharing for you, so users see only the data that they have access to.
Modes
The component accepts a mode value that determines the user interaction allowed for the form. The value for mode can be one of the following:
- edit – Creates an editable form to add a record or update an existing one. When updating an existing record, specify the record-id. Edit mode is the default when record-id is not provided, and displays a form to create new records.
- view – Creates a form to display a record that the user can also edit. The record fields each have an edit button. View mode is the default when record-id is provided.
- readonly – Creates a form to display a record without enabling edits. The form doesn’t display any buttons.
Specifying Record Fields
For all modes, the component expects the fields attribute or the layout-type attribute.
Use the fields attribute to pass record fields as an array of strings. The fields display in the order you list them.
Use the layout-type attribute to specify a Full or Compact layout. Layouts are typically defined (created and modified) by administrators. Specifying record data using layout-type loads the fields in the layout definition. All fields that have been assigned to the layout are loaded into the form.
To see the fields in the layout types in your org:
- Full – The full layout corresponds to the fields on the record detail page. From the management settings for the object that you want to edit, go to Page Layouts.
- Compact – The compact layout corresponds to the fields on the highlights panel at the top of the record. From the management settings for the object that you want to edit, go to Compact Layouts.
Editing a Record using lightning-record-form LWC
lightningRecordFormEditExampleLWC.html
<template> <lightning-record-form record-id={recordId} object-api-name={objectApiName} fields={fields} columns="2" mode="edit" onsubmit={handleSubmit}> </lightning-record-form></template> |
lightningRecordFormEditExampleLWC.js
import { LightningElement, api } from 'lwc';import NAME_FIELD from '@salesforce/schema/Account.Name';import REVENUE_FIELD from '@salesforce/schema/Account.AnnualRevenue';import INDUSTRY_FIELD from '@salesforce/schema/Account.Industry';export default class LightningRecordFormEditExampleLWC extends LightningElement { @api recordId; @api objectApiName; fields = [NAME_FIELD, REVENUE_FIELD, INDUSTRY_FIELD]; handleSubmit(event){ //you can change values from here //const fields = event.detail.fields; //fields.Name = 'My Custom Name'; // modify a field console.log('Account detail : ',event.detail.fields); console.log('Account name : ',event.detail.fields.Name); }} |
lightningRecordFormEditExampleLWC.js-meta.xml
<?xml version="1.0" encoding="UTF-8"?> <apiVersion>48.0</apiVersion> <isExposed>true</isExposed> <targets> <target>lightning__AppPage</target> <target>lightning__RecordPage</target> <target>lightning__HomePage</target> </targets></LightningComponentBundle> |
Now we can add this LWC component on the Account Record page.
- Go to Home page
- Click Setup (Gear Icon) and select Edit Page.
- Under Custom Components, find your lightningRecordFormEditExampleLWC component and drag it on right-hand side top.
- Click Save and activate.
We will get the following output
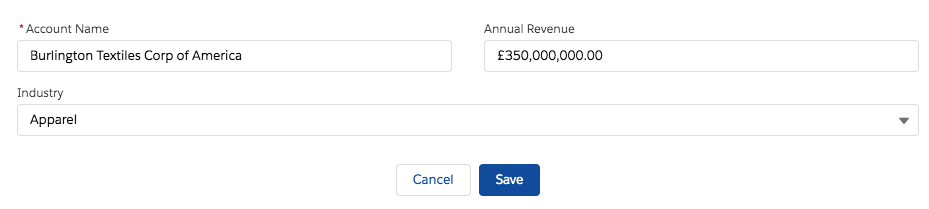
We can change html file to show full page layout
lightningRecordFormEditExampleLWC.html
<template> <lightning-record-form record-id={recordId} object-api-name="Account" layout-type="Full" columns="2" mode="edit" onsuccess={handleSuccess} onsubmit={handleSubmit}> </lightning-record-form></template> |
Creating a Record using lightning-record-form LWC
lightningRecordFormCreateExampleLWC.html
<template> <lightning-record-form object-api-name={objectApiName} fields={fields} onsuccess={handleSuccess}> </lightning-record-form></template> |
lightningRecordFormCreateExampleLWC.js
import { LightningElement, api } from 'lwc';import { ShowToastEvent } from 'lightning/platformShowToastEvent';import NAME_FIELD from '@salesforce/schema/Account.Name';import REVENUE_FIELD from '@salesforce/schema/Account.AnnualRevenue';import INDUSTRY_FIELD from '@salesforce/schema/Account.Industry';export default class LightningRecordFormCreateExampleLWC extends LightningElement { // objectApiName is "Account" when this component is placed on an account record page @api objectApiName; fields = [NAME_FIELD, REVENUE_FIELD, INDUSTRY_FIELD]; handleSuccess(event) { const evt = new ShowToastEvent({ title: "Account created", message: "Record ID: " + event.detail.id, variant: "success" }); this.dispatchEvent(evt); }} |
lightningRecordFormCreateExampleLWC.js-meta.xml
<?xml version="1.0" encoding="UTF-8"?> <apiVersion>48.0</apiVersion> <isExposed>true</isExposed> <targets> <target>lightning__AppPage</target> <target>lightning__RecordPage</target> <target>lightning__HomePage</target> </targets></LightningComponentBundle> |
Now we can add this LWC component on the Account Record page.
- Go to Home page
- Click Setup (Gear Icon) and select Edit Page.
- Under Custom Components, find your lightningRecordFormCreateExampleLWC component and drag it on right-hand side top.
- Click Save and activate.
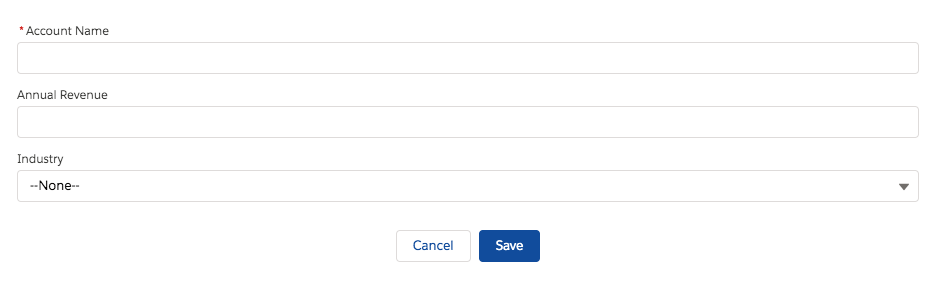
We will get the following output
For more details please refer to official link

No comments:
Post a Comment