A lightning-record-edit-form component is a wrapper component that accepts a record ID and object name. It is used to add a Salesforce record or update fields in an existing record. The component displays fields with their labels and the current values and enables you to edit their values. The lightning-input-field component is used inside the lightning-record-edit-form to create editable fields. The lightning-output-field component and other display components such as lightning-formatted-name can be used to display read-only information in your form. lightning-record-edit-form implements Lightning Data Service. It doesn’t require additional Apex controllers to create or update records. Using lightning-record-edit-form to create or update records with Apex controllers can lead to unexpected behaviors. This component also takes care of field-level security and sharing for you, so users see only the data they have access to.
lightning-record-edit-form supports the following features:
- Editing a record’s specified fields, given the record ID.
- Creating a record using specified fields.
- Customizing the form layout
- Custom rendering of record data
Editing a Record
To enable record editing, pass in the ID of the record and the corresponding object API name to be edited. Specify the fields you want to include in the record edit layout using lightning-input-field.
Include a lightning-button component with type=”submit” to automatically save any changes in the input fields when the button is clicked.
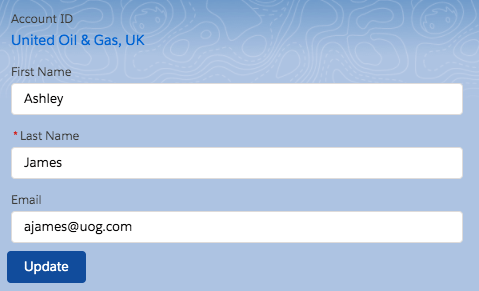
Let’s create an example to edit account record using lightning-record-edit-form in Lightning Web Component
recordEditFormEditExampleLWC.html
<template> <lightning-record-edit-form record-id={recordId} object-api-name="Contact" onsuccess={handleSuccess} onsubmit ={handleSubmit}> <lightning-messages> </lightning-messages> <lightning-output-field field-name="AccountId"> </lightning-output-field> <lightning-input-field field-name="FirstName"> </lightning-input-field> <lightning-input-field field-name="LastName"> </lightning-input-field> <lightning-input-field field-name="Email"> </lightning-input-field> <lightning-button class="slds-m-top_small" variant="brand" type="submit" name="update" label="Update"> </lightning-button> </lightning-record-edit-form></template> |
Please note that onsuccess and onsubmit are optional here and are used for Overriding Default Behaviors. Here I added these for testing.
recordEditFormEditExampleLWC.js
import { LightningElement, api} from 'lwc';export default class RecordEditFormEditExampleLWC extends LightningElement { @api recordId; handleSubmit(event) { console.log('onsubmit event recordEditForm'+ event.detail.fields); } handleSuccess(event) { console.log('onsuccess event recordEditForm', event.detail.id); }} |
recordEditFormEditExampleLWC.js-meta.xml
<?xml version="1.0" encoding="UTF-8"?> <apiVersion>48.0</apiVersion> <isExposed>true</isExposed> <targets> <target>lightning__AppPage</target> <target>lightning__RecordPage</target> <target>lightning__HomePage</target> </targets></LightningComponentBundle> |
Now we can add this LWC component on the Contact Record page.
- Go to Contact record
- Click Setup (Gear Icon) and select Edit Page.
- Under Custom Components, find your recordEditFormEditExampleLWC component and drag it on Contact Page.
- Click Save and activate.
We will get the following output
Creating a Record
To enable record creation, pass in the object API name for the record to be created. Specify the fields you want to include in the record create layout using lightning-input-field components. For more information, see the lightning-input-field documentation.
Include a lightning-button component with type=”submit” to automatically save the record when the button is clicked.
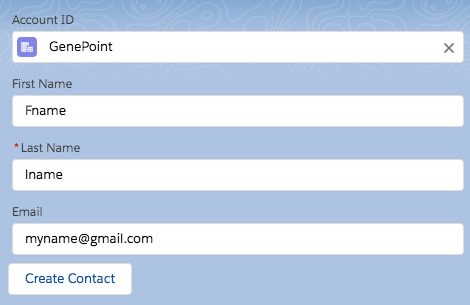
Let’s create an example to create account record using lightning-record-edit-form in Lightning Web Component
recordEditFormCreateExampleLWC.html
<template> <lightning-record-edit-form object-api-name="Contact" onsuccess={handleSuccess} onsubmit ={handleSubmit}> <lightning-messages> </lightning-messages> <lightning-input-field field-name='AccountId'></lightning-input-field> <lightning-input-field field-name='FirstName'></lightning-input-field> <lightning-input-field field-name='LastName'></lightning-input-field> <lightning-input-field field-name='Email'></lightning-input-field> <lightning-button class="slds-m-top_small" type="submit" label="Create Contact"> </lightning-button> </lightning-record-edit-form></template> |
recordEditFormCreateExampleLWC.js
import { LightningElement} from 'lwc';export default class RecordEditFormCreateExampleLWC extends LightningElement { handleSuccess(event) { console.log('onsuccess event recordEditForm',event.detail.id) } handleSubmit(event) { console.log('onsubmit event recordEditForm'+ event.detail.fields); }} |
recordEditFormCreateExampleLWC.js-meta.xml
<?xml version="1.0" encoding="UTF-8"?> <apiVersion>48.0</apiVersion> <isExposed>true</isExposed> <targets> <target>lightning__AppPage</target> <target>lightning__RecordPage</target> <target>lightning__HomePage</target> </targets></LightningComponentBundle> |
Now we can add this LWC component on the Contact Record page.
- Go to Contact record.
- Click Setup (Gear Icon) and select Edit Page.
- Under Custom Components, find your recordEditFormCreateExampleLWC component and drag it on Contact Page.
- Click Save and activate.
We will get the following output
Displaying Forms Based on a Record Type
If your org uses record types, picklist fields display values according to your record types. You must provide a record type ID using the record-type-id attribute if you have multiple record types on an object and you don’t have a default record type. Otherwise, the default record type ID is used.
Supported Objects
This component doesn’t support all Salesforce standard objects. For example, the Event and Task objects are not supported. This limitation also applies to a record that references a field that belongs to an unsupported object.
External objects and person accounts are not supported.
To work with the User object, specify FirstName and LastName instead of the Name compound field for the field-name values of lightning-input-field.
Error Handling
lightning-record-edit-form handles field-level validation errors and Lightning Data Service errors automatically. For example, entering an invalid email format for the Email field results in an error message when you move focus away from the field. Similarly, a required field like the Last Name field displays an error message when you leave the field blank and move focus away.
We need to include lightning-messages to support error handling and displaying of error messages. If the record edit layout includes a lightning-button component with type="submit", when the button is clicked the lightning-record-edit-form component automatically performs error handling and saves any changes in the input fields. Similarly, if the record create layout provides a submit button, when the button is clicked error handling is automatically performed and a new record is created with the input data you provide.
For more details please refer to official link


No comments:
Post a Comment