File Upload in Lightning Web Component(lwc)
lightning-file-upload component provides an easy and integrated way for users to upload multiple files. The file uploader includes drag-and-drop functionality and filtering by file types.
File uploads are always associated to a record, so the record-id attribute is required. Uploaded files are available in Files Home under the Owned by Me filter and on the record’s Attachments related list that’s on the record detail page. Although all file formats that are supported by Salesforce are allowed, you can restrict the file formats using the accept attribute.
lightning-file-upload component inherits styling from file selector in the Lightning Design System.
LWC file upload Example
fileUploadLWC.html
<template> <lightning-card title="LWC File Upload Example" icon-name="custom:custom19"> <lightning-file-upload label="Attach receipt" name="fileUploader" accept={acceptedFormats} record-id={recordId} onuploadfinished={handleUploadFinished} multiple> </lightning-file-upload> </lightning-card></template> |
fileUploadLWC.js
import { LightningElement, api } from 'lwc';import {ShowToastEvent} from 'lightning/platformShowToastEvent';export default class FileUploadLWC extends LightningElement { @api recordId; get acceptedFormats() { return ['.pdf', '.png','.jpg','.jpeg']; } handleUploadFinished(event) { // Get the list of uploaded files const uploadedFiles = event.detail.files; let uploadedFileNames = ''; for(let i = 0; i < uploadedFiles.length; i++) { uploadedFileNames += uploadedFiles[i].name + ', '; } this.dispatchEvent( new ShowToastEvent({ title: 'Success', message: uploadedFiles.length + ' Files uploaded Successfully: ' + uploadedFileNames, variant: 'success', }), ); }} |
fileUploadLWC.js-meta.xml
<?xml version="1.0" encoding="UTF-8"?> <apiVersion>48.0</apiVersion> <isExposed>true</isExposed> <targets> <target>lightning__AppPage</target> <target>lightning__RecordPage</target> <target>lightning__HomePage</target> </targets></LightningComponentBundle> |
Now we can add this lwc component on the account detail page.
- Go to one of account detail record
- Click Setup (Gear Icon) and select Edit Page.
- Under Custom Components, find your fileUploadLWC component and drag it on Account page.
- Click Save and activate.
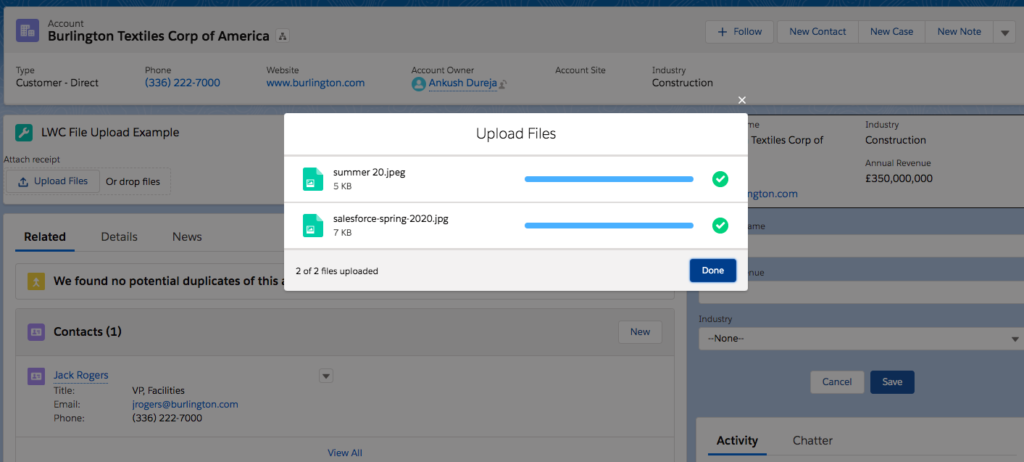
We will get the following output where the user will be able to upload multiple files on the account record.
Once the user will click on Done, user will see a success message.
File Upload Limits
By default, you can upload up to 10 files simultaneously unless your Salesforce admin has changed that limit. The org limit for the number of files simultaneously uploaded is a maximum of 25 files and a minimum of 1 file. The maximum file size you can upload is 2 GB. In Communities, the file size limits and types allowed follow the settings determined by community file moderation. By default, guest users can’t upload files. You can enable the org preference. Allow site guest users to upload files.
Usage Considerations
This component is not supported in Lightning Out or standalone apps, and displays as a disabled input. Additionally, if the Don’t allow HTML uploads as attachments or document records security setting is enabled for your organization, the file uploader cannot be used to upload files with the following file extensions: .htm, .html, .htt, .htx, .mhtm, .mhtml, .shtm, .shtml, .acgi, .svg.
For more details please refer to official link. This example is copied from this official link with small tweaks.


No comments:
Post a Comment