The Lightning Web Components programming model has three decorators that add functionality to property or function. Decorators dynamically alter the functionality of a property or function. The ability to create decorators is part of ECMAScript, but these three decorators are unique to Lightning Web Components.
- @api: To expose a public property, decorate it with @api. Public properties define the API for a component. An owner component that uses the component in its markup can access the component’s public properties. Public properties are reactive. If the value of reactive property changes, the component’s template rerenders any content that references the property.
- @track: To track a private property’s value and rerender a component when it changes, decorate the property with @track. Tracked properties are also called private reactive properties.
- @wire: To read Salesforce data, Lightning web components use a reactive wire service. When the wire service provisions data, the component rerenders. Components use @wire in their JavaScript class to specify a wire adaptor or an Apex method.
Here are three decorators in LWC in more details
@api
Public properties are reactive. If the value of public property changes, the component rerenders. To expose a public property, decorate a field with @api. Public properties define the API for a component.
To expose a public method, decorate it with @api. Public methods are part of a component’s API. To communicate down the containment hierarchy, owner and parent components can call JavaScript methods on child components.
Import @api decorator from lwc
1 | import { LightningElement, api } from 'lwc'; |
@api Example
todoItem.js
// todoItem.jsimport { LightningElement, api } from 'lwc';export default class TodoItem extends LightningElement { @api itemName = 'New Item';} |
todoItem.html
<!-- todoItem.html --><template> <div class="view"> <label>{itemName}</label> </div> |
todoApp.html
<!-- todoApp.html --><template> <div class="listing"> <c-todo-item item-name="Milk"></c-todo-item> <c-todo-item item-name="Bread"></c-todo-item> </div></template> |
@track
Fields are reactive. If a field’s value changes, and the field is used in a template or in a getter of a property that’s used in a template, the component rerenders and displays the new value.
There is one use case for @track. When a field contains an object or an array, there’s a limit to the depth of changes that are tracked. To tell the framework to observe changes to the properties of an object or to the elements of an array, decorate the field with @track
Import @api decorator from lwc
@track example
helloWorld.html
<template> <lightning-card title="HelloWorld" icon-name="custom:custom14"> <div class="slds-m-around_medium"> <p>Hello, {greeting}!</p> <lightning-input label="Name" value={greeting} onchange={changeHandler}></lightning-input> </div> </lightning-card></template> |
helloWorld.js
import { LightningElement } from 'lwc';export default class HelloWorld extends LightningElement { greeting = 'World'; changeHandler(event) { this.greeting = event.target.value; }} |
helloWorld.js-meta.xml
<?xml version="1.0" encoding="UTF-8"?> <apiVersion>45.0</apiVersion> <isExposed>true</isExposed> <targets> <target>lightning__AppPage</target> <target>lightning__RecordPage</target> <target>lightning__HomePage</target> </targets></LightningComponentBundle> |
@wire
To read Salesforce data, Lightning web components use a reactive wire service. When the wire service provisions data, the component rerenders. Components use @wire in their JavaScript class to specify a wire adapter or an Apex method.
We need to import the @salesforce/apex scoped module into JavaScript controller class.
1 | import apexMethodName from '@salesforce/apex/Namespace.Classname.apexMethodReference'; |
Here is list of important point of importing apex method:
- apexMethodName : An imported symbol that identifies the Apex method.
- apexMethodReference : The name of the Apex method to import.
- Classname : The name of the Apex class.
- Namespace—The namespace of the Salesforce organization. Specify a namespace unless the organization uses the default namespace (c), in which case don’t specify it.
Call Apex Methods In Lightning web components Example
Apex class AccountHelper
public with sharing class AccountHelper { @AuraEnabled(cacheable=true) public static List<Account> getAccountList() { return [SELECT Id, Name, Type, Rating, Phone FROM Account]; }} |
We can call the apex class in Lightning web component using these different ways:
- Wire a property
- Wire a function
- Call a method imperatively
Wire a property in lightning Web Component
We can invoke apex method from a component via the wire service. We can @wire a property or a function. Here is the syntax
import apexMethod from '@salesforce/apex/Namespace.Classname.apexMethod';@wire(apexMethod, { apexMethodParams })propertyOrFunction; |
Lets see example of Wire an Apex Method to a Property
accountListLWC.js
import { LightningElement, wire } from 'lwc';import getAccountList from '@salesforce/apex/AccountHelper.getAccountList'; export default class AccountListLWC extends LightningElement { @wire(getAccountList) accounts;} |
accountListLWC.html
<template> <lightning-card title="Account List From Apex" icon-name="custom:custom63"> <div class="slds-m-around_medium"> <template if:true={accounts.data}> <template for:each={accounts.data} for:item="acc"> <p key={acc.Id}>{acc.Name}</p> </template> </template> <template if:true={accounts.error}> {accounts.error} </template> </div> </lightning-card></template> |
accountListLWC.js-meta.xml
<?xml version="1.0" encoding="UTF-8"?> <apiVersion>48.0</apiVersion> <isExposed>true</isExposed> <targets> <target>lightning__HomePage</target> </targets></LightningComponentBundle> |
Now we can add this lwc component on account detail page.
- Go to Home page
- Click Setup (Gear Icon) and select Edit Page.
- Under Custom Components, find your accountListLWC component and drag it on right hand side top.
- Click Save and activate.
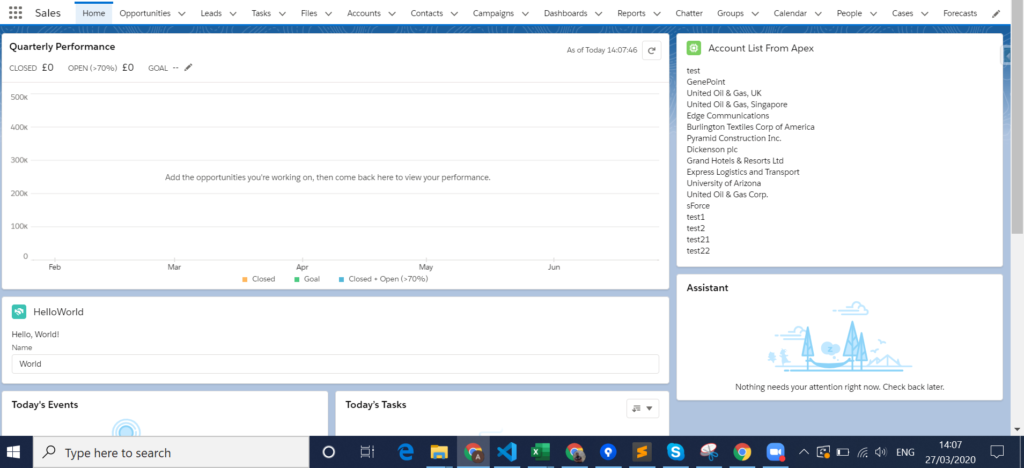
We will have following output.
For more details about decorators, please refer to official link.

No comments:
Post a Comment