Thursday, December 29, 2022

Performance Testing Tutorial – Types (Example)

What is Performance Testing?

Performance Testing is a software testing process used for testing the speed, response time, stability, reliability, scalability, and resource usage of a software application under a particular workload. The main purpose of performance testing is to identify and eliminate the performance bottlenecks in the software application. It is a subset of performance engineering and is also known as “Perf Testing”.

The focus of Performance Testing is checking a software program’s

  • Speed – Determines whether the application responds quickly
  • Scalability – Determines the maximum user load the software application can handle.
  • Stability – Determines if the application is stable under varying loads

Features and Functionality supported by a software system are not the only concern. A software application’s performance, like its response time, reliability, resource usage, and scalability, do matter. The goal of Performance Testing is not to find bugs but to eliminate performance bottlenecks.

Performance Testing is done to provide stakeholders with information about their application regarding speed, stability, and scalability. More importantly, Performance Testing uncovers what needs to be improved before the product goes to market. Without Performance Testing, the software is likely to suffer from issues such as: running slow while several users use it simultaneously, inconsistencies across different operating systems, and poor usability.

Performance testing will determine whether their software meets speed, scalability, and stability requirements under expected workloads. Applications sent to market with poor performance metrics due to nonexistent or poor performance testing are likely to gain a bad reputation and fail to meet expected sales goals.

Also, mission-critical applications like space launch programs or life-saving medical equipment should be performance tested to ensure that they run for a long period without deviations.

According to Dunn & Bradstreet, 59% of Fortune 500 companies experience an estimated 1.6 hours of downtime every week. Considering the average Fortune 500 company with a minimum of 10,000 employees is paying $56 per hour, the labor part of downtime costs for such an organization would be $896,000 weekly, translating into more than $46 million per year.

Only a 5-minute downtime of Google.com (19-Aug-13) is estimated to cost the search giant as much as $545,000.

It’s estimated that companies lost sales worth $1100 per second due to a recent Amazon Web Service Outage.

Hence, performance testing is important.

Types of Performance Testing

  • Load testing – checks the application’s ability to perform under anticipated user loads. The objective is to identify performance bottlenecks before the software application goes live.
  • Stress testing – involves testing an application under extreme workloads to see how it handles high traffic or data processing. The objective is to identify the breaking point of an application.
  • Endurance testing – is done to make sure the software can handle the expected load over a long period of time.
  • Spike testing – tests the software’s reaction to sudden large spikes in the load generated by users.
  • Volume testing – Under Volume Testing large no. of. Data is populated in a database, and the overall software system’s behavior is monitored. The objective is to check software application’s performance under varying database volumes.
  • Scalability testing – The objective of scalability testing is to determine the software application’s effectiveness in “scaling up” to support an increase in user load. It helps plan capacity addition to your software system.

Common Performance Problems

Most performance problems revolve around speed, response time, load time, and poor scalability. Speed is often one of the most important attributes of an application. A slow-running application will lose potential users. Performance testing ensures an app runs fast enough to keep a user’s attention and interest. Take a look at the following list of common performance problems and notice how speed is a common factor in many of them:

  • Long Load time – Load time is normally the initial time it takes an application to start. This should generally be kept to a minimum. While some applications are impossible to make load in under a minute, Load time should be kept under a few seconds if possible.
  • Poor response time – Response time is the time it takes from when a user inputs data into the application until the application outputs a response to that input. Generally, this should be very quick. Again if a user has to wait too long, they lose interest.
  • Poor scalability – A software product suffers from poor scalability when it cannot handle the expected number of users or when it does not accommodate a wide enough range of users. Load Testing should be done to be certain the application can handle the anticipated number of users.
  • Bottlenecking – Bottlenecks are obstructions in a system that degrade overall system performance. Bottlenecking is when either coding errors or hardware issues cause a decrease in throughput under certain loads. Bottlenecking is often caused by one faulty section of code. The key to fixing a bottlenecking issue is finding the section of code causing the slow down and trying to fix it there. Bottlenecking is generally fixed by either fixing poor running processes or adding additional Hardware. Some common performance bottlenecks are
    • CPU utilization
    • Memory utilization
    • Network utilization
    • Operating System limitations
    • Disk usage

How to Do Performance Testing

The methodology adopted for performance testing can vary widely, but the objective for performance tests remains the same. It can help demonstrate that your software system meets certain pre-defined performance criteria. Or it can help compare the performance of two software systems. It can also help identify parts of your software system which degrade its performance.

Below is a generic process on how to perform performance testing

Performance testing process image

Performance Testing Process

Step 1) Identify Your Testing Environment

Know your physical test environment, production environment and what testing tools are available. Understand details of the hardware, software and network configurations used during testing before you begin the testing process. It will help testers create more efficient tests. It will also help identify possible challenges that testers may encounter during the performance testing procedures.

Step 2) Identify the Performance Acceptance Criteria

This includes goals and constraints for throughput, response times and resource allocation. It is also necessary to identify project success criteria outside of these goals and constraints. Testers should be empowered to set performance criteria and goals because often the project specifications will not include a wide enough variety of performance benchmarks. Sometimes there may be none at all. When possible finding a similar application to compare to is a good way to set performance goals.

Step 3) Plan & Design Performance Tests

Determine how usage is likely to vary amongst end users and identify key scenarios to test for all possible use cases. It is necessary to simulate a variety of end users, plan performance test data and outline what metrics will be gathered.

Step 4) Configuring the Test Environment

Prepare the testing environment before execution. Also, arrange tools and other resources.

Step 5) Implement Test Design

Create the performance tests according to your test design.

Step 6) Run the Tests

Execute and monitor the tests.

Step 7) Analyze, Tune and Retest

Consolidate, analyze and share test results. Then fine tune and test again to see if there is an improvement or decrease in performance. Since improvements generally grow smaller with each retest, stop when bottlenecking is caused by the CPU. Then you may have the consider option of increasing CPU power.

Performance Testing Metrics: Parameters Monitored

The basic parameters monitored during performance testing include:

performance testing metrics image

  • Processor Usage – an amount of time processor spends executing non-idle threads.
  • Memory use – amount of physical memory available to processes on a computer.
  • Disk time – amount of time disk is busy executing a read or write request.
  • Bandwidth – shows the bits per second used by a network interface.
  • Private bytes – number of bytes a process has allocated that can’t be shared amongst other processes. These are used to measure memory leaks and usage.
  • Committed memory – amount of virtual memory used.
  • Memory pages/second – number of pages written to or read from the disk in order to resolve hard page faults. Hard page faults are when code not from the current working set is called up from elsewhere and retrieved from a disk.
  • Page faults/second – the overall rate in which fault pages are processed by the processor. This again occurs when a process requires code from outside its working set.
  • CPU interrupts per second – is the avg. number of hardware interrupts a processor is receiving and processing each second.
  • Disk queue length – is the avg. no. of read and write requests queued for the selected disk during a sample interval.
  • Network output queue length – length of the output packet queue in packets. Anything more than two means a delay and bottlenecking needs to be stopped.
  • Network bytes total per second – rate which bytes are sent and received on the interface including framing characters.
  • Response time – time from when a user enters a request until the first character of the response is received.
  • Throughput – rate a computer or network receives requests per second.
  • Amount of connection pooling – the number of user requests that are met by pooled connections. The more requests met by connections in the pool, the better the performance will be.
  • Maximum active sessions – the maximum number of sessions that can be active at once.
  • Hit ratios – This has to do with the number of SQL statements that are handled by cached data instead of expensive I/O operations. This is a good place to start for solving bottlenecking issues.
  • Hits per second – the no. of hits on a web server during each second of a load test.
  • Rollback segment – the amount of data that can rollback at any point in time.
  • Database locks – locking of tables and databases needs to be monitored and carefully tuned.
  • Top waits – are monitored to determine what wait times can be cut down when dealing with the how fast data is retrieved from memory
  • Thread counts – An applications health can be measured by the no. of threads that are running and currently active.
  • Garbage collection – It has to do with returning unused memory back to the system. Garbage collection needs to be monitored for efficiency.

Example Performance Test Cases

  • Test Case 01: Verify response time is not more than 4 secs when 1000 users access the website simultaneously.
  • Test Case 02: Verify response time of the Application Under Load is within an acceptable range when the network connectivity is slow
  • Test Case 03: Check the maximum number of users that the application can handle before it crashes.
  • Test Case 04: Check database execution time when 500 records are read/written simultaneously.
  • Test Case 05: Check CPU and memory usage of the application and the database server under peak load conditions
  • Test Case 06: Verify the response time of the application under low, normal, moderate, and heavy load conditions.

During the actual performance test execution, vague terms like acceptable range, heavy load, etc. are replaced by concrete numbers. Performance engineers set these numbers as per business requirements and the technical landscape of the application.

Performance Test Tools

There are a wide variety of performance testing tools available in the market. The tool you choose for testing will depend on many factors such as types of the protocol supported, license cost, hardware requirements, platform support etc. Below is a list of popularly used testing tools.

  • LoadNinja – is revolutionizing the way we load tests. This cloud-based load testing tool empowers teams to record & instantly playback comprehensive load tests, without complex dynamic correlation & run these load tests in real browsers at scale. Teams are able to increase test coverage. & cut load testing time by over 60%.
  • HeadSpin– offers the industry’s best performance testing capabilities for its users. Users can Optimize their digital experiences with the performance testing capabilities of the HeadSpin Platform by identifying and resolving performance issues across applications, devices and networks. HeadSpin provides actual, real-world data removing ambiguity from thousands of devices, networks and locations. Users can leverage advanced AI capabilities to automatically identify performance issues in testing before they impact users.
  • BlazeMeter – was designed and built by engineers who are passionate about open source. BlazeMeter gets you massive scale load and performance testing directly from your IDE. Plus, see what your user sees under load with combined UX & load testing. And the best part? It’s all in there: performance, functional, scriptless, API testing and monitoring, test data, and mock services.
  • HP LoadRunner is the most popular performance testing tools on the market today. This tool is capable of simulating hundreds of thousands of users, putting applications under real-life loads to determine their behavior under expected loads.Loadrunner features a virtual user generator which simulates the actions of live human users.
  • Jmeter one of the leading tools used for load testing of web and application servers.

FAQ

Which Applications should we Performance Test?

Performance Testing is always done for client-server based systems only. This means, any application which is not a client-server based architecture, must not require Performance Testing.

For example, Microsoft Calculator is neither client-server based nor it runs multiple users; hence it is not a candidate for Performance Testing.

Introduction to HP LoadRunner  and its Architecture

What is the difference between Performance Testing & Performance Engineering?

It is of significance to understand the difference between Performance Testing and Performance Engineering. An understanding is shared below:

Performance Testing is a discipline concerned with testing and reporting the current performance of a software application under various parameters.

Performance Engineering is the process by which software is tested and tuned with the intent of realizing the required performance. This process aims to optimize the most important application performance trait i.e. user experience.

Historically, testing and tuning have been distinctly separate and often competing realms. In the last few years, however, several pockets of testers and developers have collaborated independently to create tuning teams. Because these teams have met with significant success, the concept of coupling performance testing with performance tuning has caught on, and now we call it performance engineering.

Conclusion

In Software Engineering, Performance testing is necessary before marketing any software product. It ensures customer satisfaction & protects an investor’s investment against product failure. Costs of performance testing are usually more than made up for with improved customer satisfaction, loyalty, and retention.

White Box Testing – What is, Techniques, Example & Types

White Box Testing

White Box Testing is a testing technique in which software’s internal structure, design, and coding are tested to verify input-output flow and improve design, usability, and security. In white box testing, code is visible to testers, so it is also called Clear box testing, Open box testing, Transparent box testing, Code-based testing, and Glass box testing.

It is one of two parts of the Box Testing approach to software testing. Its counterpart, Blackbox testing, involves testing from an external or end-user perspective. On the other hand, White box testing in software engineering is based on the inner workings of an application and revolves around internal testing.

The term “WhiteBox” was used because of the see-through box concept. The clear box or WhiteBox name symbolizes the ability to see through the software’s outer shell (or “box”) into its inner workings. Likewise, the “black box” in “Black Box Testing” symbolizes not being able to see the inner workings of the software so that only the end-user experience can be tested.

White Box Testing Video

Click here if the video is not accessible

What do you verify in White Box Testing?

White box testing involves the testing of the software code for the following:

  • Internal security holes
  • Broken or poorly structured paths in the coding processes
  • The flow of specific inputs through the code
  • Expected output
  • The functionality of conditional loops
  • Testing of each statement, object, and function on an individual basis

The testing can be done at system, integration, and unit levels of software development. One of the basic goals of whitebox testing is to verify a working flow for an application. It involves testing a series of predefined inputs against expected or desired outputs so that when a specific input does not result in the expected output, you have encountered a bug.

How do you perform White Box Testing?

We have divided it into two basic steps to give you a simplified explanation of white box testing. This is what testers do when testing an application using the white box testing technique:

STEP 1) UNDERSTAND THE SOURCE CODE

The first thing a tester will often do is learn and understand the source code of the application. Since white box testing involves the testing of the inner workings of an application, the tester must be very knowledgeable in the programming languages used in the applications they are testing. Also, the testing person must be highly aware of secure coding practices. Security is often one of the primary objectives of testing software. The tester should be able to find security issues and prevent attacks from hackers and naive users who might inject malicious code into the application either knowingly or unknowingly.

STEP 2) CREATE TEST CASES AND EXECUTE

The second basic step to white box testing involves testing the application’s source code for proper flow and structure. One way is by writing more code to test the application’s source code. The tester will develop little tests for each process or series of processes in the application. This method requires that the tester must have intimate knowledge of the code and is often done by the developer. Other methods include Manual Testing, trial, and error testing and the use of testing tools as we will explain further on in this article.


WhiteBox Testing


WhiteBox Testing Example

Consider the following piece of code

Printme (int a, int b) {                       ------------  Printme is a function 
    int result = a+ b; 
    If (result> 0)
    	Print ("Positive", result)
    Else
    	Print ("Negative", result)
    }                                        -----------   End of the source code

The goal of WhiteBox testing in software engineering is to verify all the decision branches, loops, and statements in the code.

To exercise the statements in the above white box testing example, WhiteBox test cases would be

  • A = 1, B = 1
  • A = -1, B = -3

White Box Testing Techniques

A major White box testing technique is Code Coverage analysis. Code Coverage analysis eliminates gaps in a Test Case suite. It identifies areas of a program that are not exercised by a set of test cases. Once gaps are identified, you create test cases to verify untested parts of the code, thereby increasing the quality of the software product

There are automated tools available to perform Code coverage analysis. Below are a few coverage analysis techniques a box tester can use:

Statement Coverage:- This technique requires every possible statement in the code to be tested at least once during the testing process of software engineering.

Branch Coverage – This technique checks every possible path (if-else and other conditional loops) of a software application.

Apart from above, there are numerous coverage types such as Condition Coverage, Multiple Condition Coverage, Path Coverage, Function Coverage etc. Each technique has its own merits and attempts to test (cover) all parts of software code. Using Statement and Branch coverage you generally attain 80-90% code coverage which is sufficient.

Following are important WhiteBox Testing Techniques: 
  • Statement Coverage
  • Decision Coverage
  • Branch Coverage
  • Condition Coverage
  • Multiple Condition Coverage
  • Finite State Machine Coverage
  • Path Coverage
  • Control flow testing
  • Data flow testing

Types of White Box Testing

White box testing encompasses several testing types used to evaluate the usability of an application, block of code or specific software package. There are listed below —

  • Unit Testing: It is often the first type of testing done on an application. Unit Testing is performed on each unit or block of code as it is developed. Unit Testing is essentially done by the programmer. As a software developer, you develop a few lines of code, a single function or an object and test it to make sure it works before continuing Unit Testing helps identify a majority of bugs, early in the software development lifecycle. Bugs identified in this stage are cheaper and easy to fix.
  • Testing for Memory Leaks: Memory leaks are leading causes of slower running applications. A QA specialist who is experienced at detecting memory leaks is essential in cases where you have a slow running software application.

Apart from the above, a few testing types are part of both black box and white box testing. They are listed below

  • White Box Penetration Testing: In this testing, the tester/developer has full information of the application’s source code, detailed network information, IP addresses involved and all server information the application runs on. The aim is to attack the code from several angles to expose security threats.
  • White Box Mutation Testing: Mutation testing is often used to discover the best coding techniques to use for expanding a software solution.

White Box Testing Tools

Below is a list of top white box testing tools.

Advantages of White Box Testing

  • Code optimization by finding hidden errors.
  • White box tests cases can be easily automated.
  • Testing is more thorough as all code paths are usually covered.
  • Testing can start early in SDLC even if GUI is not available.

Disadvantages of WhiteBox Testing

  • White box testing can be quite complex and expensive.
  • Developers who usually execute white box test cases detest it. The white box testing by developers is not detailed and can lead to production errors.
  • White box testing requires professional resources with a detailed understanding of programming and implementation.
  • White-box testing is time-consuming, bigger programming applications take the time to test fully.

Conclusion:

  • White box testing can be quite complex. The complexity involved has a lot to do with the application being tested. A small application that performs a single simple operation could be white box tested in few minutes, while larger programming applications take days, weeks, and even longer to fully test.
  • White box testing in software testing should be done on a software application as it is being developed after it is written and again after each modification.

Database (Data) Testing Tutorial with Sample Test Cases

What is Database Testing?

Database Testing is a type of software testing that checks the schema, tables, triggers, etc. of the Database under test. It also checks data integrity and consistency. It may involve creating complex queries to load/stress test the Database and check its responsiveness.

Why Database Testing is Important?

Database Testing is Important in software testing because it ensures data values and information received and stored into database are valid or not. Database testing helps to save data loss, saves aborted transaction data and no unauthorized access to the information. Database is important for any software application hence testers must have good knowledge of SQL for database testing.

The GUI is usually given the most emphasis by the test and development team members since the Graphical User Interface happens to be the most visible part of the application. However, what is also important is to validate the information that is the heart of the application, aka DATABASE.

Let us consider a Banking application wherein a user makes transactions. Now from Database Testing or DB Testing viewpoint following, 

  1. The application stores the transaction information in the application database and displays them correctly to the user.
  2. No information is lost in the process.
  3. No partially performed or aborted operation information is saved by the application.
  4. No unauthorized individual is allowed to access the user’s information.

To ensure all these above objectives, we need to use data validation or data testing.

In this Database Testing tutorial, we will learn about different Database Testing concepts like:

Differences between User-Interface Testing and Data Testing

Database(Data) Testing Tutorial with Sample TestCases

User-Interface testing Database or Data testing
This type of testing is also known as Graphical User Interface testing or Front-end Testing. This type of testing is also known as Backend Testing or data testing.
This type of testing chiefly deals with all the testable items that are open to the user for viewership and interaction like Forms, Presentation, Graphs, Menus, and Reports, etc. (created through VB, VB.net, VC++, Delphi – Front-end Tools ) This type of testing chiefly deals with all the testable items that are generally hidden from the user for viewership. These include internal processes and storage like Assembly, DBMS like Oracle, SQL Server, MYSQL, etc.
This type of testing includes validating the

  • text boxes
  • select dropdowns
  • calendars and buttons
  • Page navigation
  • display of images
  • Look and feel of the overall application
This type of testing involves validating:

  • the schema
  • database tables
  • columns
  • keys and indexes
  • stored procedures triggers
  • database server validations
  • validating data duplication
The tester must be thoroughly knowledgeable about the business requirements as well as the usage of the development tools and the usage of automation frameworks and tools. To be able to perform backend testing, must the tester have a strong background in the database server and Structured Query Language concepts.

Database(Data) Testing Tutorial with Sample TestCases

The 3 types of Database Testing are

  1. Structural Testing
  2. Functional Testing
  3. Non-functional Testing

In this Database Testing tutorial, we will look into each type and its sub-types one by one.

Structural Database Testing

Structural Database Testing is a database testing technique that validates all the elements inside data repository that are mainly used for data storage and which are not allowed to be directly manipulated by end-users. The validation of database servers is also an important consideration in structural database testing. A successful completion of this testing needs mastery in SQL queries.

What is Schema Testing?

Schema Testing in database testing validates various schema formats associated with the database and verifies whether the mapping formats of tables/views/columns are compatible with mapping formats of user interface. The main purpose of schema testing is to ensure the schema mapping between front-end and back-end are similar. Thus, it is also referred to as mapping testing.

Let us discuss the most important checkpoints for schema testing.

  1. Validation of the various schema formats associated with the databases. Many times the mapping format of the table may not be compatible with the mapping format present in the user interface level of the application.
  2. There is a need for verification in the case of unmapped tables/views/columns.
  3. There is also a need to verify whether heterogeneous databases in an environment are consistent with the overall application mapping.

Let us also look at some of the interesting Database Testing tools for validating database schemas.

  • DBUnit that is integrated with Ant is very suitable for mapping testing.
  • SQL Server allows the testers to be able to check and to query the schema of the Database by writing simple queries and not through code.

For example, if the developers want to change a table structure or delete it, the tester would want to ensure that all the Stored Procedures and Views that use that table are compatible with the particular change. Another example could be that if the testers want to check for schema changes between 2 databases, they can do that by using simple queries.

Database Table, Column Testing

Let us look into various checks for database and column testing.

  1. Whether the mapping of the database fields and columns in the backend is compatible with those mappings in the front-end?
  2. Validation of the length and naming convention of the database fields and columns as specified by the requirements.
  3. Validation of the presence of any unused/unmapped database tables/columns.
  4. Validation of the compatibility of the
  • datatype
  • field lengths

of the back-end database columns with that of those present at the front-end of the application.

  1. Whether the database fields allow the user to provide desired user inputs as required by the business requirement specification documents.

Keys and indexes testing

Important checks for keys and indexes –

  1. Check whether the required
  • Primary Key
  • Foreign Key

constraints have been created on the required tables.

  1. Check whether the references for foreign keys are valid.
  2. Check whether the data type of the primary key and the corresponding foreign keys are the same in the two tables.
  3. Check whether the required naming conventions have been followed for all the keys and indexes.
  4. Check the size and length of the required fields and indexes.
  5. Whether the required
  • Clustered indexes
  • Non Clustered indexes

have been created on the required tables as specified by the business requirements.

Stored Procedures Testing

Important tests to check stored procedures are:

  1. Whether the development team did adopt the required
  • coding standard conventions
  • exception and error handling

for all the stored procedures for all the modules for the application under test.

  1. Whether the development team did cover all the conditions/loops by applying the required input data to the application under test?
  2. Whether the development team did properly apply the TRIM operation whenever data is fetched from the required tables in the Database?
  3. Whether the manual execution of the Stored Procedure provides the end-user with the required result?
  4. Whether the manual execution of the Stored Procedure ensures the table fields are being updated as required by the application under test?
  5. Whether the execution of the Stored Procedures enables the implicit invoking of the required triggers?
  6. Validation of the presence of any unused stored procedures.
  7. Validation for Allow Null condition which can be done at the database level.
  8. Validation of the fact that all the Stored Procedures and Functions have been successfully executed when the Database under test is blank.
  9. Validation of the overall integration of the stored procedure modules as per as the requirements of the application under test.

Some of the useful Database Testing tools for testing stored procedures are LINQ , SP Test tool etc.

Trigger Testing

  1. Whether the required coding conventions have been followed during the coding phase of the Triggers?
  2. Check whether the triggers executed for the respective DML transactions have fulfilled the required conditions.
  3. Whether the trigger updates the data correctly once they have been executed?
  4. Validation of the required Update/Insert/Delete triggers functionality in the realm of the application under test.

Database Server Validations

  1. Check the database server configurations as specified by the business requirements.
  2. Check the authorization of the required user to perform only those levels of actions that are required by the application.
  3. Check that the database server is able to cater to the needs of the maximum allowed number of user-transactions as specified by the business requirement specifications.

Functional Database Testing

Functional Database Testing is a type of database testing that is used to validate the functional requirements of a database from the end-user’s perspective. The main goal of functional database testing is to test whether the transactions and operations performed by the end-users which are related to the database works as expected or not.

Following are the basic conditions that need to be observed for database validations.

  • Whether the field is mandatory while allowing NULL values on that field?
  • Whether the length of each field is of sufficient size?
  • Whether all similar fields have the same names across tables?
  • Whether there are any computed fields present in the Database?

This particular process is the validation of the field mappings from the end-user viewpoint. In this particular scenario, the tester would perform an operation at the database level and then would navigate to the relevant user interface item to observe and validate whether the proper field validations have been carried out or not.

The vice versa condition whereby, first operation is carried out by the tester at the user interface, and then the same is validated from the back end is should also be done.

Checking data integrity and consistency

Following checks are important

  1. Whether the data is logically well organized?
  2. Whether the data stored in the tables is correct and as per the business requirements?
  3. Whether there are any unnecessary data present in the application under test?
  4. Whether the data has been stored as per as the requirement with respect to data which has been updated from the user interface?
  5. Whether the TRIM operations performed on the data before inserting data into the Database under test?
  6. Whether the transactions have been performed according to the business requirement specifications and whether the results are correct or not?
  7. Whether the data has been properly committed if the transaction has been successfully executed?
  8. Whether the data has been rolled backed successfully if the transaction has not been executed successfully by the end-user?
  9. Whether the data has been rolled backed if the transaction has not been executed successfully and multiple heterogeneous databases have been involved in the transaction in question?
  10. Whether all the transactions have been executed by using the required design procedures as specified by the system business requirements?

Login and User Security

The validations of the login and user security credentials need to take into consideration the following things.

  1. Whether the application prevents the user from proceeding further in the application in case of a
  • invalid username but valid password
  • valid username but invalid password.
  • invalid username and invalid password.
  1. Whether the user is allowed to perform only those specific operations which are specified by the business requirements?
  2. Whether the data is secured from unauthorized access?
  3. Whether there are different user roles created with different permissions?
  4. Whether all the users have required levels of access on the specified Database as required by the business specifications?
  5. Check that sensitive data like passwords, creditcard numbers are encrypted and not stored as plain text in Database. It is a good practice to ensure all accounts should have passwords that are complex and not easily guessed.

Non-functional testing

Non-functional testing in the context of database testing can be categorized into various categories as required by the business requirements. These can be load testing, Stress Testing, Security Testing, Usability Testing, and Compatibility Testing, and so on. The load testing, as well as stress testing, which can be grouped under the gamut of Performance Testing serves two specific purposes when it comes to the role of non-functional testing.

Risk quantification– Quantification of risk helps the stakeholders to ascertain the various system response time requirements under required levels of load. This is the original intent of any quality assurance task. We need to note that load testing does not mitigate risk directly, but through the processes of risk identification and risk quantification, presents corrective opportunities and an impetus for remediation that will mitigate risk.

Minimum system equipment requirement– The minimum system configuration that will allow the system to meet the formally stated performance expectations of stakeholders. So that extraneous hardware, software, and the associated cost of ownership can be minimized. This particular requirement can be categorized as the overall business optimization requirement.

Load Testing

The purpose of any load test should be clearly understood and documented. The following types of configurations are a must for load testing.

  1. The most frequently used user transactions have the potential to impact the performance of all of the other transactions if they are not efficient.
  2. At least one non-editing user transaction should be included in the final test suite, so that performance of such transactions can be differentiated from other more complex transactions.
  3. The more important transactions that facilitate the core objectives of the system should be included, as failure under a load of these transactions has, by definition, the greatest impact.
  4. At least one editable transaction should be included so that performance of such transactions can be differentiated from other transactions.
  5. Optimum response time under huge number of virtual users for all the prospective requirements.
  6. Effective times for fetching of various records.

Important load testing tools are load runner, win runner and JMeter.

What is Database Stress Testing?

Database Stress Testing is a testing method used to stress test database system with heavy load such that it fails at some point. This helps in identifying the breakdown point of database system. It requires proper planning and efforts in order to avoid over usage of resources. Data stress testing is also known as torturous testing or fatigue testing.

Important stress testing tools are LoadRunner and JMeter.

Most common occurring issues during database testing

A significant amount of overhead could be involved to determine the state of the database transactions
  • Solution: The overall process planning and timing should be organized so that no time and cost based issues appear.
  • New test data have to be designed after cleaning up of the old test data.
  • Solution: A prior plan and methodology for test data generation should be at hand.
  • An SQL generator is required to transform SQL validators in order to ensure the SQL queries are apt for handling the required database test cases.
  • Solution: Maintenance of the SQL queries and their continuous updating is a significant part of the overall testing process which should be part of the overall test strategy.
  • The above mentioned prerequisite ensure that the set-up of the database testing procedure could be costly as well as time consuming.
  • Solution: There should be a fine balance between quality and overall project schedule duration.
  • Myths or Misconceptions related to Database Testing

    Database Testing requires plenty of expertise and it is a very tedious job

    Reality: Effective and efficient Database Testing in Software Testing provides long-term functional stability to the overall application thus it is necessary to put in hard work behind it.

    Database testing adds extra work bottleneck

    Reality: On the contrary, database testing adds more value to the overall work by finding out hidden issues and thus pro-actively helping to improve the overall application.

    Database testing slows down the overall development process

    Reality: Significant amount of database testing helps in the overall improvement of quality for the database application.

    Database testing could be excessively costly

    Reality: Any expenditure on database testing is a long-term investment which leads to long-term stability and robustness of the application. Thus expenditure on Database Testing or SQL Testing is necessary.

    Best Practices

    • All data including the metadata as well as the functional data needs to be validated according to their mapping by the requirement specification documents.
    • Verification of the test data which has been created by / in consultation with the development team needs to be validated.
    • Validation of the output data by using both manual as well as automation procedures.
    • Deployment of various techniques such as the cause effect graphing technique, equivalence partitioning technique and boundary-value analysis technique for generation of required test data conditions.
    • The validation rules of referential integrity for the required database tables also need to be validated.
    • The selection of default table values for validation on database consistency is a very important concept Whether the log events have been successfully added in the Database for all required login events
    • Does scheduled jobs execute in timely manner?
    • Take timely backup of Database.

    Checkout – Database Testing Interview Questions & Answers

    Defect/Bug Life Cycle in Software Testing

    What is Defect Life Cycle?

    Defect Life Cycle or Bug Life Cycle in software testing is the specific set of states that defect or bug goes through in its entire life. The purpose of Defect life cycle is to easily coordinate and communicate current status of defect which changes to various assignees and make the defect fixing process systematic and efficient.

    Defect Status

    Defect Status or Bug Status in defect life cycle is the present state from which the defect or a bug is currently undergoing. The goal of defect status is to precisely convey the current state or progress of a defect or bug in order to better track and understand the actual progress of the defect life cycle.

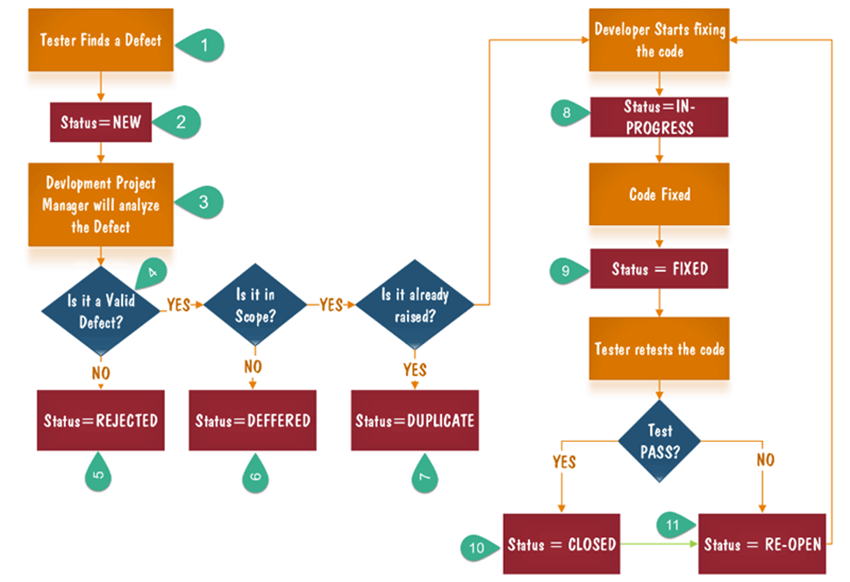
    The number of states that a defect goes through varies from project to project. Below lifecycle diagram, covers all possible states

    • New: When a new defect is logged and posted for the first time. It is assigned a status as NEW.
    • Assigned: Once the bug is posted by the tester, the lead of the tester approves the bug and assigns the bug to the developer team
    • Open: The developer starts analyzing and works on the defect fix
    • Fixed: When a developer makes a necessary code change and verifies the change, he or she can make bug status as “Fixed.”
    • Pending retest: Once the defect is fixed the developer gives a particular code for retesting the code to the tester. Since the software testing remains pending from the testers end, the status assigned is “pending retest.”
    • Retest: Tester does the retesting of the code at this stage to check whether the defect is fixed by the developer or not and changes the status to “Re-test.”

    Defect Life Cycle

    • Verified: The tester re-tests the bug after it got fixed by the developer. If there is no bug detected in the software, then the bug is fixed and the status assigned is “verified.”
    • Reopen: If the bug persists even after the developer has fixed the bug, the tester changes the status to “reopened”. Once again the bug goes through the life cycle.
    • Closed: If the bug is no longer exists then tester assigns the status “Closed.” 
    • Duplicate: If the defect is repeated twice or the defect corresponds to the same concept of the bug, the status is changed to “duplicate.”
    • Rejected: If the developer feels the defect is not a genuine defect then it changes the defect to “rejected.”
    • Deferred: If the present bug is not of a prime priority and if it is expected to get fixed in the next release, then status “Deferred” is assigned to such bugs
    • Not a bug:If it does not affect the functionality of the application then the status assigned to a bug is “Not a bug”.

    Defect Life Cycle Explained

    Defect Life Cycle or Bug Life Cycle -  Stuff You Must Know!

      1. Tester finds the defect
      2. Status assigned to defect- New
      3. A defect is forwarded to Project Manager for analyze
      4. Project Manager decides whether a defect is valid
      5. Here the defect is not valid- a status is given “Rejected.”
      6. So, project manager assigns a status rejected. If the defect is not rejected then the next step is to check whether it is in scope. Suppose we have another function- email functionality for the same application, and you find a problem with that. But it is not a part of the current release when such defects are assigned as a postponed or deferred status.
      7. Next, the manager verifies whether a similar defect was raised earlier. If yes defect is assigned a status duplicate.
      8. If no the defect is assigned to the developer who starts fixing the code. During this stage, the defect is assigned a status in- progress.
      9. Once the code is fixed. A defect is assigned a status fixed
      10. Next, the tester will re-test the code. In case, the Test Case passes the defect is closed. If the test cases fail again, the defect is re-opened and assigned to the developer.
      11. Consider a situation where during the 1st release of Flight Reservation a defect was found in Fax order that was fixed and assigned a status closed. During the second upgrade release the same defect again re-surfaced. In such cases, a closed defect will be re-opened.

    That’s all to Bug Life Cycle

    This training video describes the various stages in a bug aka defect life cycle and its importance with the help of an example


    Bugzilla Tutorial – Defect Tracking Tool

    What is Bugzilla?

    Bugzilla is an open-source issue/bug tracking system that allows developers to keep track of outstanding problems with their product. It is written in Perl and uses MYSQL database.

    Bugzilla is a Defect tracking tool, however, it can be used as a test management tool as such it can be easily linked with other Test Case management tools like Quality Center, Testlink etc.

    This open bug-tracker enables users to stay connected with their clients or employees, to communicate about problems effectively throughout the data-management chain.

    Key features of Bugzilla includes

    • Advanced search capabilities
    • E-mail Notifications
    • Modify/file Bugs by e-mail
    • Time tracking
    • Strong security
    • Customization
    • Localization

    How to log-in to Bugzilla

    Step 1) Use the following link for your hands-on. To create an account in Bugzilla tool or to login into the existing account go to New Account or Log in option in the main menu.

    Bugzilla Tutorial for Beginners

    Step 2) Now, enter your personal details to log into Bugzilla

    1. User ID
    2. Password
    3. And then click on “Log in”

    Bugzilla Tutorial for Beginners

    Step 3) You are successfully logged into Bugzilla system

    Bugzilla Tutorial for Beginners

    Creating a Bug-report in Bugzilla

    Step 1) To create a new bug in Bugzilla, visit the home-page of Bugzilla and click on NEW tab from the main menu

    Bugzilla Tutorial for Beginners

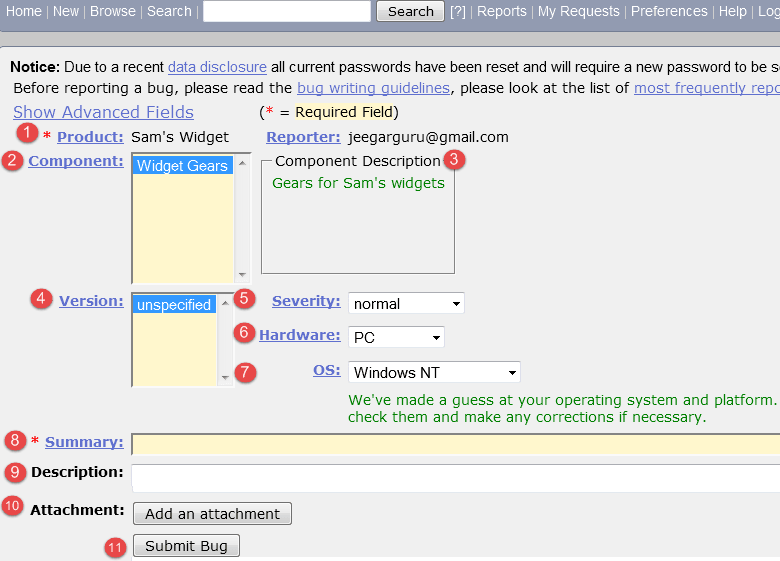
    Step 2) In the next window

    1. Enter Product
    2. Enter Component
    3. Give Component description
    4. Select version,
    5. Select severity
    6. Select Hardware
    7. Select OS
    8. Enter Summary
    9. Enter Description
    10. Attach Attachment
    11. Submit

    NOTE: The above fields will vary as per your customization of Bugzilla

    Bugzilla Tutorial for Beginners

    NOTE: The mandatory fields are marked with *.

    In our case field’s

    • Summary
    • Description

    Are mandatory

    If you do not fill them you will get a screen like below

    Bugzilla Tutorial for Beginners

    Step 4) Bug is created ID# 26320 is assigned to our Bug. You can also add additional information to the assigned bug like URL, keywords, whiteboard, tags, etc. This extra-information is helpful to give more detail about the Bug you have created.

    1. Large text box
    2. URL
    3. Whiteboard
    4. Keywords
    5. Tags
    6. Depends on
    7. Blocks
    8. Attachments

      Bugzilla Tutorial for Beginners

    Step 5) In the same window if you scroll down further. You can select deadline date and also status of the bug. Deadline in Bugzilla usually gives the time-limit to resolve the bug in given time frame.

    Bugzilla Tutorial for Beginners

    Create Graphical Reports

    Graphical reports are one way to view the current state of the bug database. You can run reports either through an HTML table or graphical line/pie/bar-chart-based one. The idea behind graphical report in Bugzilla is to define a set of bugs using the standard search interface and then choosing some aspect of that set to plot on the horizontal and vertical axes. You can also get a 3-dimensional report by choosing the option of “Multiple Pages”.

    Reports are helpful in many ways, for instance, if you want to know which component has the largest number of bad bugs reported against it. In order to represent that in the graph, you can select severity on X-axis and component on Y-axis, and then click on generate a report. It will generate a report with crucial information.

    Bugzilla Tutorial for Beginners

    The graph below shows the Bar chart representation for the Bugs severity in component “Widget Gears”. In the graph below, the most severe bug or blockers in components are 88 while bugs with normal severity are at the top with 667 number.

    Bugzilla Tutorial for Beginners

    Likewise, we will also see the line graph for %complete Vs Deadline

    Step 1) To view your report in a graphical presentation,

    • Click on Report from Main Menu
    • Click on the Graphical reports from the given option

    Bugzilla Tutorial for Beginners

    Step 2) Let’s create a graph of % Complete Vs Deadline

    In here on the vertical axis we chose % Complete and on our horizontal axis we chose Deadline. This will give the graph of amount of work done in percentage against the set-deadline.

    Now, set various option to present reports graphically

    1. Vertical Axis
    2. Horizontal Axis
    3. Multiple Images
    4. Format- Line graph, Bar chart or Pie chart
    5. Plot data set
    6. Classify your bug
    7. Classify your product
    8. Classify your component
    9. Classify bug status
    10. Select resolution
    11. Click on generate a report

    Bugzilla Tutorial for Beginners

    The image of the graph will appear somewhat like this

    Bugzilla Tutorial for Beginners

    Browse Function

    Step 1) To locate your bug we use browse function, click on Browse button from the main menu.

    Bugzilla Tutorial for Beginners

    Step 2) As soon as you click on browse button a window will open saying “Select a product category to browse” as shown below, we browse the bug according to the category.

    • After clicking the browse button
    • Select the product “Sam’s Widget” as such you have created a bug inside it

    Bugzilla Tutorial for Beginners

    Step 3) It opens another window, in this click on component “widget gears”. Bugzilla Components are sub-sections of a product. For instance, where our product is SAM’S WIDGET whose component is WIDGET GEARS.

    Bugzilla Tutorial for Beginners

    Step 4) when you click on the component, it will open another window. All the Bugs created under particular category will be listed over here. From that Bug-list, choose your Bug#ID to see more details about the bug.

    Bugzilla Tutorial for Beginners

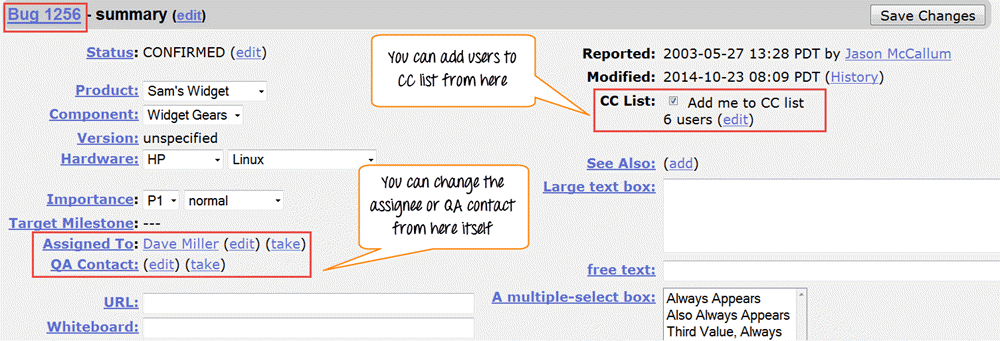
    It will open another window, where information about your bug can be seen more in detail. In the same window, you can also change the assignee, QA contact or CC list.

    Bugzilla Tutorial for Beginners

    How to use Simple search option in Bugzilla

    Bugzilla provides two ways of searching for bugs, they are Simple Search and Advance Search methods.

    Step 1) We will first learn the “Simple Search” method. Click on search button from the main menu and then follow these steps

    1. Click on “Simple Search” button
    2. Choose the status of the Bug – choose Open if you are looking the bug in Open status and closed for bug in closed status
    3. Choose your category and component, and you can also put keywords related to your bug
    4. Click on the search

    Bugzilla Tutorial for Beginners

    Step 2) Here we will search for both option open and closed status, first we have selected closed status for bug and clicked search button.

    Bugzilla Tutorial for Beginners

    For closed status, it fetched 12 bugs.

    Bugzilla Tutorial for Beginners

    Step 3) Likewise we have searched for Open status as well, and it has fetched 37 bugs related to our queries.

    Bugzilla Tutorial for Beginners

    Also, at the bottom of the screen you have various options like how you want to see your bug – an XML format, in Long format or just Time summary. Apart from that you can also use other option like send mail to bug assignee, change several bugs at once or change column of the screen, etc.

    Bugzilla Tutorial for Beginners

    In next step, we will demonstrate one of this function change column of the screen, through which we will learn how to add or remove the column to the existing column.

    How to add or remove a column to default search screen

    Step 1) Click on the Change Column as shown in above screen-shot. It will open a new window where you have to follow these steps.

    • Select any given option from the column you want to appear in the main screen – here we have selected % complete
    • Click on the arrow button, it will move % complete column from à Available Column to the Selected column

    These steps will move the selected column from left to right.

    Bugzilla Tutorial for Beginners

    The % complete is moved from left to right as shown below, and once we click on change column it will appear in the main screen

    Bugzilla Tutorial for Beginners

    Before- Search result screen before using “Change Column” option-

    • There is no % complete column appears in search screen result as shown below

    Bugzilla Tutorial for Beginners

    After- Search result screen after using “Change Column” option

    • You can see % complete column added to the extreme right in the existing column in the main screen, which was not their previously.

    Bugzilla Tutorial for Beginners

    NOTE: Likewise you can remove or add any column you want.

    How to use Advanced Search in Bugzilla

    Step 1) After a Simple search we will look into the Advanced Search option for that you have to follow the following steps.

    1. Click on the advanced search option
    2. Select option for a summary, how you want to search
    3. Enter the keyword for your bug- for example, Widget gears twisted
    4. Select the category of your Bug under classification, here we selected Widget
    5. Choose your product under which your Bug was created- Sam’s Widget
    6. Component- Widget gears
    7. Status- Confirmed
    8. Resolution

    Bugzilla Tutorial for Beginners

    Step 2) Once you select all the option, click on search button. It will detect the bug you created

    Bugzilla Tutorial for Beginners

    The advanced search will find your bug, and it will appear on the screen like this

    Bugzilla Tutorial for Beginners

    How to use preferences in BugZilla

    Preferences in Bugzilla is used to customize the default setting made by Bugzilla as per our requirement. There are mainly five preferences available

    • General Preferences
    • E-mail Preferences
    • Saved Searches
    • Account Information
    • Permissions

    General Preferences

    For general preferences, you have a various option like changing Bugzilla general appearance, a position of the additional comment box, automatically add me to cc, etc. Here we will see how to change the general appearance of the Bugzilla.

    There are many changes you can do which are self-explanatory, and you can choose the option as per your requirement.

    Step 1)

    • To set the background Skin of Bugzilla
    • Go to Bugzilla general preference (Skin)
    • Select the option you want to see as a change and submit the change ( DuskàClassic )
    • A message will appear on the window saying changes have been saved, as soon as you submit the changes

    Bugzilla Tutorial for Beginners

    After the skin preference is changed to Classic from Dusk, the background color of the screen appears white

    Bugzilla Tutorial for Beginners

    Likewise, for other default settings changes can be done.

    E-mail preferences

    E-mail preferences enable you to decide how to receive the message and from whom to receive the messages.

    Step 1) To set the e-mail preferences

    1. Click on e-mail services
    2. Enable or disable the mail to avoid receiving notification about changes to a bug
    3. Receiving a mail when someone asks to set a flag or when someone sets a flag you asked for
    4. When and from whom you want to receive mail and under which condition. After marking your option at the end, submit the changes.

    Bugzilla Tutorial for Beginners

    Saved Searches Preference

    Saved searches preference gives you the freedom to decide whether to share your bug or not to share.

    Step 1) Click on saved searches, it will open window with the option like edit bugs, don’t share, can confirm, etc. Choose the option as per your need.

    Bugzilla Tutorial for Beginners

    Step 2) We can run our bug from “Saved Searches”.

    • Go to Saved Searches under preference
    • Click on the “Run” button

    Bugzilla Tutorial for Beginners

    As soon as you run your search from Saved Searches it opens your bug as shown below

    Bugzilla Tutorial for Beginners

    Step 3) In the same window we can also choose specific users with whom we want to share the search by marking or unmarking the checkbox against the users

    Bugzilla Tutorial for Beginners

    That’s all to BugZilla!

    Understanding Wire vs Imperative Apex Method Calls in Salesforce Lightning Web Components (LWC)

    Understanding Wire vs Imperative Apex Method Calls in Salesforce Lightning Web Components (LWC) Introduction: Salesforce Lightning Web ...