To render HTML conditionally, add the lwc:if|elseif={property} and lwc:else
directive to a nested <template> tag that encloses the
conditional content.
The lwc:if|elseif directives bind {property} to the template, removing and inserting DOM
elements based on whether the data is a truthy or falsy value.
if:true and if:false directives are no longer recommended as we intend to deprecate
and remove these directives in the future. We recommend that you replace their usage
with the lwc:if|elseif|else conditional directives to
future-proof your code.This example has two properties property1 and property2.
<template>
    <template lwc:if={property1}>
        Statement1
    </template>
    <template lwc:elseif={property2}>
        Statement2
    </template>
    <template lwc:else>
        Statement3
    </template>
</template>
Only one of the three statements renders:
Statement1renders ifproperty1is true.Statement2renders ifproperty1is false andproperty2is true.Statement3renders ifproperty1andproperty2are false.
Although the example uses all three directives, lwc:elseif and lwc:else are optional.
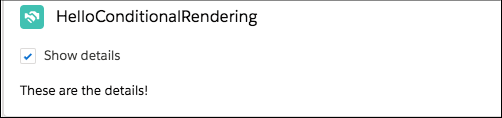
Let’s look at another example. This template contains a checkbox labeled Show
details. When a user selects or deselects the checkbox, the handleChange function sets the value of the areDetailsVisible property. If the areDetailsVisible property is true, the lwc:if
directive renders the nested template, which displays These are the
details!.
<!-- helloConditionalRendering.html -->
<template>
    <lightning-card title="HelloConditionalRendering" icon-name="custom:custom14">
        <div class="slds-m-around_medium">
<lightning-input type="checkbox" label="Show details" onchange={handleChange}></lightning-input>
<template lwc:if={areDetailsVisible}>
<div class="slds-m-vertical_medium">
These are the details!
</div>
</template>
</div>
</lightning-card>
</template>Notice that the JavaScript doesn’t manipulate the DOM, it simply changes the value of a property.
// helloConditionalRendering.js
import { LightningElement } from 'lwc';

export default class HelloConditionalRendering extends LightningElement {
    areDetailsVisible = false;

    handleChange(event) {
        this.areDetailsVisible = event.target.checked;
    }
}

No comments:
Post a Comment