lightning-record-form. To customize the form layout or
to preload custom values, use lightning-record-edit-form.Create a Record Using lightning-record-form
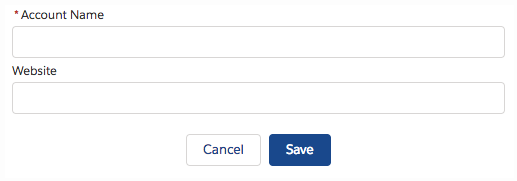
To create a record using lightning-record-form,
leave out the record-id attribute. This example
creates a record using import references for the account object and its fields. The
form displays a Save button that updates the record, and a Cancel button that
reverts changes.
<template>
    <lightning-record-form
        object-api-name={accountObject}
        fields={myFields}
        onsuccess={handleAccountCreated}>
    </lightning-record-form>
</template>
The field imports are passed in to the myFields array. When you import references, the references are
validated at compile time. Place this example on a record page to inherit its
record-id and object-api-name properties.
import { LightningElement } from 'lwc';
import ACCOUNT_OBJECT from '@salesforce/schema/Account';
import NAME_FIELD from '@salesforce/schema/Account.Name';
import WEBSITE_FIELD from '@salesforce/schema/Account.Website';

/**
 * Creates Account records.
 */
export default class AccountCreator extends LightningElement {

    accountObject = ACCOUNT_OBJECT;
    myFields = [NAME_FIELD, WEBSITE_FIELD];

    handleAccountCreated(){
        // Run code when account is created.
    }
}
When data saves successfully, the fields display pencil icons to denote that inline editing is available. This view is displayed until you refresh or reload the page.

Create a Record with a Custom Field Layout Using lightning-record-edit-form
Use lightning-record-edit-form to customize field
layout or data rendering.
Pass in the fields you want to lightning-input-field, which displays an input control based on the
record field type. To enable automatic display of error messages, include the
lightning-messages component.
<template>
<lightning-record-edit-form object-api-name={accountObject} onsuccess={handleAccountCreated}>
<lightning-messages></lightning-messages>
<div class="slds-grid">
<div class="slds-col slds-size_1-of-2">
<lightning-input-field field-name={nameField}> </lightning-input-field>
<lightning-input-field field-name={websiteField}> </lightning-input-field>
</div>
<div class="slds-col slds-size_1-of-2">
<!-- More lightning-input-field components here -->
</div>
</div>
<lightning-button type="submit" variant="brand" label="Create Account"> </lightning-button>
</lightning-record-edit-form>
</template>To access the fields you want, use the field imports from @salesforce/schema. Importing references to
objects and fields ensures that your code works, even when object and field names
change.
import { LightningElement } from 'lwc';
import ACCOUNT_OBJECT from '@salesforce/schema/Account';
import NAME_FIELD from '@salesforce/schema/Account.Name';
import WEBSITE_FIELD from '@salesforce/schema/Account.Website';
/**
* Creates Account records.
*/
export default class AccountCreator extends LightningElement {
accountObject = ACCOUNT_OBJECT;
nameField = NAME_FIELD;
websiteField = WEBSITE_FIELD;
handleAccountCreated(){
// Run code when account is created.
}
}Prepopulate Field Values Using lightning-record-edit-form
To provide a field value when the form displays, use the value attribute on lightning-input-field.
This example displays a form with a custom value for the account name field. The form creates an account record when the button is clicked.
<template>
<lightning-record-edit-form object-api-name="Account">
<lightning-input-field field-name="Name"
value="My Field Value">
</lightning-input-field>
<lightning-button class="slds-m-top_small"
type="submit"
label="Create new">
             </lightning-button>
    </lightning-record-edit-form>
</template>
To programmatically set the value when the form loads, provide the value in
JavaScript. This example sets the value using the myValue property. You can set this value programmatically later,
as
shown by the onclick event handler, which calls
the overrideValue method.
<template>
   <lightning-record-edit-form object-api-name="Account">
       <lightning-input-field field-name="Name"
                              value={myValue}></lightning-input-field>
       <lightning-button class="slds-m-top_small"
                         type="submit"
                         label="Create new"></lightning-button>
   </lightning-record-edit-form>

    <lightning-button label="Override Value"
                     onclick={overrideValue}></lightning-button>

</template>
import { LightningElement, api } from 'lwc';
export default class FieldValueCreateExample extends LightningElement {
myValue = "My Account Name";
overrideValue(event) {
this.myValue = "My New Name";
}
}Reset the Form to the Original Field Values
lightning-record-edit-form doesn’t provide its own
Cancel and Save buttons like
lightning-record-form does. To create your
own Cancel button that reverts the field values, include a
lightning-button component that calls the
reset() method. Replace the record-id with your own. For an example, see Edit a Record.
Override Default Behaviors Using Custom Events
lightning-record-edit-form handles form submission
and errors automatically. To display an error message above or below the form fields
automatically, include lightning-messages before
or after your lightning-input-field
components.
lightning-record-edit-form enables you to handle
the following custom events.
error—Fired when the form returns a server-side error.load—Fired when the form loads record data.submit—Fired when the form submits changed record data.success—Fired when the form submits changed record data.
No comments:
Post a Comment