Saturday, April 8, 2023

Create a Record in LWC

The simplest way to create a form that enables a user to create a record is to use lightning-record-form. To customize the form layout or to preload custom values, use lightning-record-edit-form.

Tip If you need more flexibility than these components provide, see Build Custom UI to Create and Edit Records.

Create a Record Using lightning-record-form

To create a record using lightning-record-form, leave out the record-id attribute. This example creates a record using import references for the account object and its fields. The form displays a Save button that updates the record, and a Cancel button that reverts changes.

<template>
    <lightning-record-form
        object-api-name={accountObject}
        fields={myFields}
        onsuccess={handleAccountCreated}>
    </lightning-record-form>
</template>

The field imports are passed in to the myFields array. When you import references, the references are validated at compile time. Place this example on a record page to inherit its record-id and object-api-name properties.

import { LightningElement } from 'lwc';
import ACCOUNT_OBJECT from '@salesforce/schema/Account';
import NAME_FIELD from '@salesforce/schema/Account.Name';
import WEBSITE_FIELD from '@salesforce/schema/Account.Website';

/**
 * Creates Account records.
 */
export default class AccountCreator extends LightningElement {

    accountObject = ACCOUNT_OBJECT;
    myFields = [NAME_FIELD, WEBSITE_FIELD];

    handleAccountCreated(){
        // Run code when account is created.
    }
}
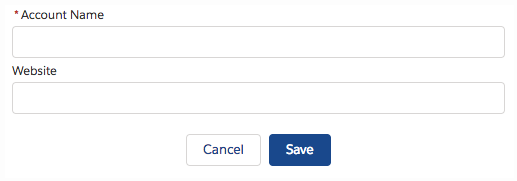
Form with Cancel and Save buttons

When data saves successfully, the fields display pencil icons to denote that inline editing is available. This view is displayed until you refresh or reload the page.

Inline edits

Create a Record with a Custom Field Layout Using lightning-record-edit-form

Use lightning-record-edit-form to customize field layout or data rendering.

Pass in the fields you want to lightning-input-field, which displays an input control based on the record field type. To enable automatic display of error messages, include the lightning-messages component.

<template>
    <lightning-record-edit-form object-api-name={accountObject} 
                               onsuccess={handleAccountCreated}>
        <lightning-messages></lightning-messages>
        <div class="slds-grid">
            <div class="slds-col slds-size_1-of-2">
                <lightning-input-field field-name={nameField}>
                      </lightning-input-field>
                <lightning-input-field field-name={websiteField}>
              </lightning-input-field>
            </div>
            <div class="slds-col slds-size_1-of-2">
                <!-- More lightning-input-field components here -->
            </div>
         </div>
        <lightning-button type="submit" variant="brand" label="Create Account">
             </lightning-button>
    </lightning-record-edit-form>
</template>

To access the fields you want, use the field imports from @salesforce/schema. Importing references to objects and fields ensures that your code works, even when object and field names change.

import { LightningElement } from 'lwc';
import ACCOUNT_OBJECT from '@salesforce/schema/Account';
import NAME_FIELD from '@salesforce/schema/Account.Name';
import WEBSITE_FIELD from '@salesforce/schema/Account.Website';

/**
 * Creates Account records.
 */
export default class AccountCreator extends LightningElement {
    accountObject = ACCOUNT_OBJECT;
    nameField = NAME_FIELD;
    websiteField = WEBSITE_FIELD;

    handleAccountCreated(){
        // Run code when account is created.
    }
}

Prepopulate Field Values Using lightning-record-edit-form

To provide a field value when the form displays, use the value attribute on lightning-input-field.

This example displays a form with a custom value for the account name field. The form creates an account record when the button is clicked.

<template>
   <lightning-record-edit-form object-api-name="Account">
       <lightning-input-field field-name="Name"
                              value="My Field Value">
       </lightning-input-field>
       <lightning-button class="slds-m-top_small"
                         type="submit"
                         label="Create new">
       </lightning-button>
   </lightning-record-edit-form>
</template>

To programmatically set the value when the form loads, provide the value in JavaScript. This example sets the value using the myValue property. You can set this value programmatically later, 

as shown by the onclick event handler, which calls the overrideValue method.

<template>
   <lightning-record-edit-form object-api-name="Account">
       <lightning-input-field field-name="Name"
                              value={myValue}></lightning-input-field>
       <lightning-button class="slds-m-top_small"
                         type="submit"
                         label="Create new"></lightning-button>
   </lightning-record-edit-form>

    <lightning-button label="Override Value"
                     onclick={overrideValue}></lightning-button>

</template>
import { LightningElement, api } from 'lwc';
export default class FieldValueCreateExample extends LightningElement {
   myValue = "My Account Name";
    overrideValue(event) {
       this.myValue = "My New Name";
   }
}

Reset the Form to the Original Field Values

lightning-record-edit-form doesn’t provide its own Cancel and Save buttons like lightning-record-form does. To create your own Cancel button that reverts the field values, include a lightning-button component that calls the reset() method. Replace the record-id with your own. For an example, see Edit a Record.

Override Default Behaviors Using Custom Events

lightning-record-edit-form handles form submission and errors automatically. To display an error message above or below the form fields automatically, include lightning-messages before or after your lightning-input-field components.

lightning-record-edit-form enables you to handle the following custom events.

  • error—Fired when the form returns a server-side error.
  • load—Fired when the form loads record data.
  • submit—Fired when the form submits changed record data.
  • success—Fired when the form submits changed record data.

Create and Dispatch Events in LWC

Create and dispatch events in a component’s JavaScript class. To create an event, use the CustomEvent() constructor. To dispatch an event, call the EventTarget.dispatchEvent() method.

The CustomEvent() constructor has one required parameter, which is a string indicating the event type. As a component author, you name the event type when you create the event. You can use any string as your event type. However, we recommend that you conform with the DOM event standard.

  • No uppercase letters
  • No spaces
  • Use underscores to separate words

Don’t prefix your event name with the string on, because inline event handler names must start with the string on. If your event is called onmessage, the markup would be <c-my-component ononmessage={handleMessage}>. Notice the doubled word onon, which is confusing.

Let’s jump into some code.

The c-paginator component contains Previous and Next buttons. When a user clicks the buttons, the component creates and dispatches previous and next events. You can drop the paginator component into any component that needs Previous and Next buttons. That parent component listens for the events and handles them.

<!-- paginator.html -->
<template>
    <lightning-layout>
        <lightning-layout-item>
            <lightning-button label="Previous" icon-name="utility:chevronleft"  
onclick={previousHandler}></lightning-button>
        </lightning-layout-item>
        <lightning-layout-item flexibility="grow"></lightning-layout-item>
        <lightning-layout-item>
            <lightning-button label="Next" icon-name="utility:chevronright" 
icon-position="right" onclick={nextHandler}></lightning-button>
        </lightning-layout-item>
    </lightning-layout>
</template>

When a user clicks a button, the previousHandler or nextHandler function executes. These functions create and dispatch the previous and next events.

// paginator.js
import { LightningElement } from 'lwc';

export default class Paginator extends LightningElement {
    previousHandler() {
        this.dispatchEvent(new CustomEvent('previous'));
    }

    nextHandler() {
        this.dispatchEvent(new CustomEvent('next'));
    }
}

These events are simple “something happened” events. They don’t pass a data payload up the DOM tree, they simply announce that a user clicked a button.

Let’s drop paginator into a component called c-event-simple, which listens for and handles the previous and next events.

To listen for events, use an HTML attribute with the syntax oneventtype. Since our event types are previous and next, the listeners are onprevious and onnext.

<!-- eventSimple.html -->
<template>
    <lightning-card title="EventSimple" icon-name="custom:custom9">
        <div class="slds-m-around_medium">
            <p class="slds-m-vertical_medium content">Page {page}</p>
            <c-paginator onprevious={previousHandler} onnext={nextHandler}></c-paginator>
        </div>
    </lightning-card>
</template>

When c-event-simple receives the previous and next events, previousHandler and nextHandler increase and decrease the page number.

// eventSimple.js
import { LightningElement } from 'lwc';

export default class EventSimple extends LightningElement {
    page = 1;

    previousHandler() {
        if (this.page > 1) {
            this.page = this.page - 1;
        }
    }

    nextHandler() {
        this.page = this.page + 1;
    }
}

Example Check out the c-event-simple component and the c-paginator component in the github.com/trailheadapps/lwc-recipes repo.

Pass Data in an Event

To pass data up to a receiving component, set a detail property in the CustomEvent constructor. Receiving components access the data in the detail property in the event listener’s handler function.


Warning The CustomEvent interface imposes no type requirements or structure on the detail property. However it’s important to send only primitive data. JavaScript passes all data types by reference except for primitives. If a component includes an object in its detail property, any listener can mutate that object without the component’s knowledge. This is a bad thing! It’s a best practice either to send only primitives, or to copy data to a new object before adding it to the detail property. Copying the data to a new object ensures that you’re sending only the data you want, and that the receiver can’t mutate your data.

Let’s look at the c-event-with-data component from the lwc-recipes repo.

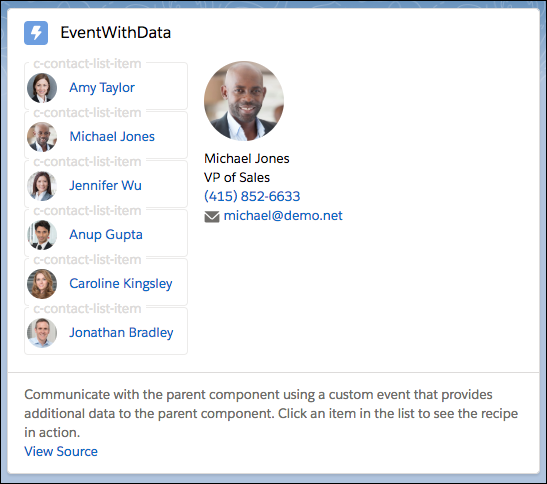
List of contacts with a selected contact that shows name, title, phone number, and email address.

Each item in the list of contacts is a nested c-contact-list-item component.

The c-contact-list-item component wraps the contact name and picture in an anchor tag with an onclick event listener that executes the selectHandler function.

<!-- contactListItem.html -->
<template>
    <a href="#" onclick={selectHandler}>
        <lightning-layout vertical-align="center">
            <lightning-layout-item>
                <img src={contact.Picture__c}></img>
            </lightning-layout-item>
            <lightning-layout-item padding="around-small">
                <p>{contact.Name}</p>
            </lightning-layout-item>
        </lightning-layout>
    </a>
</template>

When a user clicks to select a contact, the component creates and dispatches a CustomEvent called selected. The event includes the data detail: this.contact.Id, which is the ID of the selected contact. The parent, c-event-custom, uses the contact reference to display more information about the contact.

// contactListItem.js
import { LightningElement, api } from 'lwc';

export default class ContactListItem extends LightningElement {
    @api contact;

    selectHandler(event) {
        // Prevents the anchor element from navigating to a URL.
        event.preventDefault();

        // Creates the event with the contact ID data.
        const selectedEvent = new CustomEvent('selected', { detail: this.contact.Id });

        // Dispatches the event.
        this.dispatchEvent(selectedEvent);
    }
}

The c-event-with-data component listens for the selected event in the onselected attribute and handles it in the contactSelected event handler.

<!-- eventWithData.html -->
<template>
    <lightning-card title="EventWithData" icon-name="custom:custom9">
        <lightning-layout class="slds-m-around_medium">
            <lightning-layout-item>
                <template lwc:if={listIsNotEmpty}>
                    <template for:each={contacts.data} for:item="contact">
                        <c-contact-list-item key={contact.Id} contact={contact} 
                           onselected={contactSelected}></c-contact-list-item>
                    </template>
                </template>
            </lightning-layout-item>
            <lightning-layout-item class="slds-m-left_medium">
                <template lwc:if={selectedContact}>
                    <img src={selectedContact.Picture__c}></img>
                    <p>{selectedContact.Name}</p>
                    <p>{selectedContact.Title}</p>
                    <p><lightning-formatted-phone value={selectedContact.Phone}>
                       </lightning-formatted-phone></p>
                    <p><lightning-formatted-email value={selectedContact.Email}>
                        </lightning-formatted-email></p>
                </template>
            </lightning-layout-item>
        </lightning-layout>
    </lightning-card>
</template>

In the contactSelected event handler, the component assigns the event.detail property to the contactId property. It finds the contact with that ID in the contacts array provisioned via @wire, and displays the contact’s name, title, phone, and email in the template.

// eventWithData.js
import { LightningElement, wire } from 'lwc';
import getContactList from '@salesforce/apex/ContactController.getContactList';

export default class EventWithData extends LightningElement {
    selectedContact;

    @wire(getContactList) contacts;

    contactSelected(event) {
        const contactId = event.detail;
        this.selectedContact = this.contacts.data.find(contact => contact.Id === contactId);
    }

    get listIsNotEmpty() {
        return this.contacts && Array.isArray(this.contacts.data) 
                   && this.contacts.data.length > 0;
    }
}

Example Find this sample code in the github.com/trailheadapps/lwc-recipes repo.

Understanding Wire vs Imperative Apex Method Calls in Salesforce Lightning Web Components (LWC)

Understanding Wire vs Imperative Apex Method Calls in Salesforce Lightning Web Components (LWC) Introduction: Salesforce Lightning Web ...